Getting Started
Quick Start
Get up and running with EOS Integration Kit in minutes
This guide will get you from zero to a working multiplayer lobby in minutes using Device ID authentication - the simplest way to test EOS features.
1. Login with Device ID
Device ID creates an anonymous account tied to the device. Perfect for testing.
Use the Login Using Connect Interface node with Device ID as the login method.
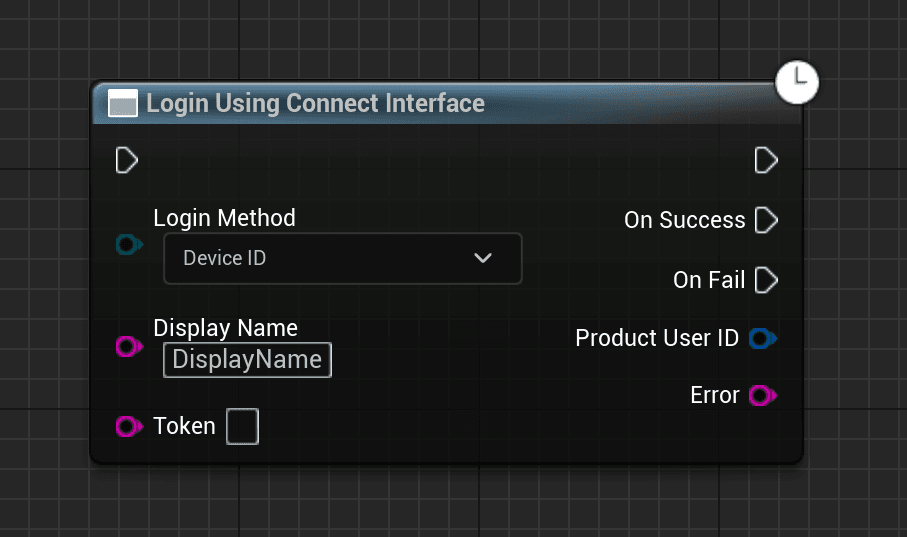
Display Name cannot be empty.
// Build.cs
PrivateDependencyModuleNames.AddRange(new string[] { "OnlineSubsystem", "OnlineSubsystemUtils" });
// Header
#include "OnlineSubsystem.h"
#include "OnlineSubsystemUtils.h"
#include "Interfaces/OnlineIdentityInterface.h"
void LoginWithDeviceID();
void OnLoginComplete(int32 LocalUserNum, bool bWasSuccess, const FUniqueNetId& UserId, const FString& Error);// Source
void UMyClass::LoginWithDeviceID()
{
if (const IOnlineSubsystem* OnlineSub = Online::GetSubsystem(GetWorld()))
{
if (const IOnlineIdentityPtr Identity = OnlineSub->GetIdentityInterface())
{
FOnlineAccountCredentials Credentials;
Credentials.Type = "noeas_+_EIK_ECT_DEVICEID_ACCESS_TOKEN";
Credentials.Id = "PlayerName"; // Display name
Identity->OnLoginCompleteDelegates->AddUObject(this, &UMyClass::OnLoginComplete);
Identity->Login(0, Credentials);
}
}
}
void UMyClass::OnLoginComplete(int32 LocalUserNum, bool bWasSuccess, const FUniqueNetId& UserId, const FString& Error)
{
if (bWasSuccess)
{
UE_LOG(LogTemp, Log, TEXT("Login successful! UserID: %s"), *UserId.ToString());
}
else
{
UE_LOG(LogTemp, Error, TEXT("Login failed: %s"), *Error);
}
}2. Create a Lobby
Once logged in, create a lobby that others can join.
Use the Create EIK Lobby node after successful login.
Key settings:
- Max Players: How many players can join
- Is Public: Whether the lobby appears in search results
- Use Voice Chat: Enable built-in voice communication
void UMyClass::CreateLobby()
{
    if (const IOnlineSubsystem* OnlineSub = Online::GetSubsystem(GetWorld()))
    {
        if (const IOnlineLobbyPtr Lobby = OnlineSub->GetLobbyInterface())
        {
            FOnlineSessionSettings Settings;
            Settings.NumPublicConnections = 4;
            Settings.bShouldAdvertise = true;
            Settings.bUsesPresence = true;

            Lobby->OnCreateLobbyCompleteDelegates.AddUObject(this, &UMyClass::OnLobbyCreated);
            Lobby->CreateLobby(*Online::GetSubsystem(GetWorld())->GetIdentityInterface()->GetUniquePlayerId(0), Settings);
        }
    }
}
3. Find and Join Lobbies
Search for available lobbies and join one.
- Use Find EIK Lobbies to search for available lobbies
- The results contain a list of lobbies with their details
- Use Join EIK Lobby with the selected lobby to connect
void UMyClass::FindLobbies()
{
    if (const IOnlineSubsystem* OnlineSub = Online::GetSubsystem(GetWorld()))
    {
        if (const IOnlineLobbyPtr Lobby = OnlineSub->GetLobbyInterface())
        {
            Lobby->OnFindLobbiesCompleteDelegates.AddUObject(this, &UMyClass::OnLobbiesFound);
            Lobby->FindLobbies(*Online::GetSubsystem(GetWorld())->GetIdentityInterface()->GetUniquePlayerId(0), FOnlineLobbySearchQuery());
        }
    }
}
Testing Locally
To test multiplayer on a single machine:
- Launch two instances of your game (use standalone game, not PIE for the second instance)
- Login on both with different display names
- Create a lobby on one instance
- Find and join from the other instance
EIK supports Play-In-Editor (PIE) testing with multiple clients. Go to Play → Advanced Settings and set the number of players.
Next Steps
- Authentication Methods - Learn about Epic Games, Steam, and other login options
- Lobbies - Advanced lobby features
- Sessions - For dedicated server setups
- Voice Chat - Add voice communication